Many of us are familiar with Optional Binding and the “if let” syntax convention when unwrapping an optional value. The “if let” allows us to unwrap optional values safely only when there is a value, and if not, the code block will not run. Simply put, its focus is on the “true” condition when a value exists.
Then, can I just use the “if let” all the time? Why should I even bother using a guard let statement?
Well, let’s decide why by examining the codes below.

In this example, we are getting user inputs from the text fields on an iOS device to make a complete story. The user inputs are: first name, age, city and occupation. Here, we are getting optional values, and they must be unwrapped to be displayed correctly on a label.
We might immediately think of the “if let” to unwrap those optional values, by coding something like this:

What do you think about this code? It works well, but look at the lengthy lines of nested conditions. What if we need more inputs from users? Should we keep on writing nested conditions? It seems pretty messy.
We can also use the “if let” with early exit as follows:

It looks a bit better than the previous one. However, the values unwrapped by the “if let” can only be used in the scope of the if block. Outside of the if block, it must be force unwrapped again using !. It doesn’t seem so efficient.
Now, let’s take a look at the code using “guard” statements.

The “guard” statement, on the other hand, makes our code more readable. Readability and easy maintenance are extremely important, especially when working with other programmers. The “guard” statement helps avoid the complexity of numerous nested conditions as seen in the “if let” example above. Different from the “if let”, the “guard” statement makes early exits possible with an emphasis on negative cases with errors rather than on positive cases. This means we can test negative cases earlier by running the guard’s else statement if the condition is NOT met, rather than wait for nested conditions to pass first.
What makes the “guard” statement truly stand out, however, is that unwrapped optional values remain available in the rest of the cold block. That means when the conditions pass, optional values are unwrapped, and they become available for use without a need to force unwrap them again, even outside of the conditions. There’s no need to force unwrap them like we did in the “if let” with early exit. See the code below.

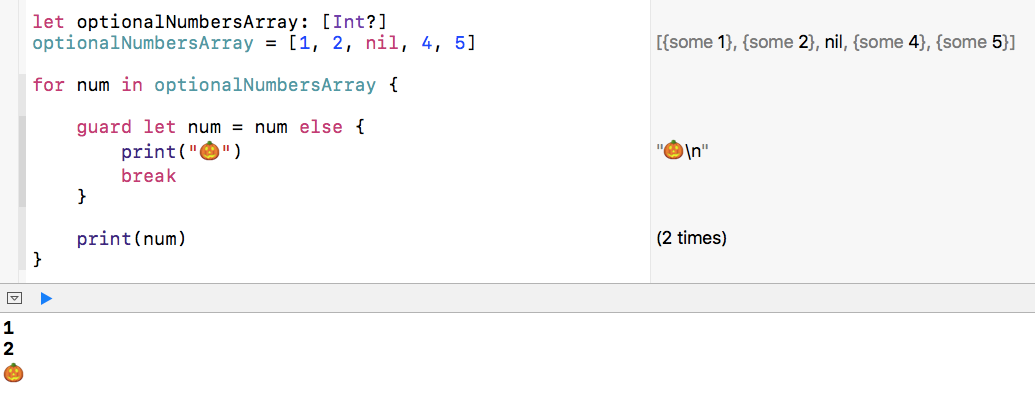
One thing to note: each “guard” statement must always transfer control by exiting the scope it is in. More specifically, if the “guard” is used in functions, it would usually “return”, and in loops, it would “break” or “continue”. (Note: “break” and “continue” cannot be used in functions!)
We can easily test and run this in a Playground.

Using the “guard” statement can improve the quality of our code with better readability and easier maintenance. It is totally a matter of preference whether we want to use “if let” or “guard”, but familiarizing ourselves with both syntaxes will certainly help us become more flexible developers.
No comments:
Post a Comment